Do you press your seams open? Do you use starch when you are piecing? I have been using starch for a few years and wanted to talk a little about why.
Recently, our guild made blocks for me as I changed from being president to member. Three years was plenty long and it was time for new change and energy in leadership. I was inspired by a mini quilt by Sajuta Shah and I brought my own fabrics for the guild members to take and come up with a free-form and improv block for me based on Sajuta’s quilt. Here are just a few of what was made
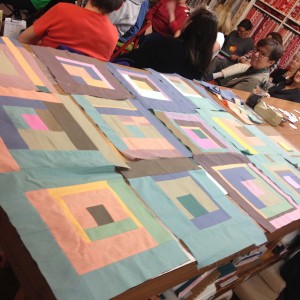
I’m so excited to put these together soon. But, in my directions to put the blocks together, I asked that all seams be pressed open, and to finish with starch which is my preference and practice. Lynn, our new president, then asked me to talk about why I starch and to give a starch demo which she called “The Great Starch Off”. She then presented me with a box of commercial starch, sizing, as well as two homemade starches.
I went home and tried out all the starches and had surprising results which I’ll get to in a minute. The reason I starch is really an extension of pressing open my seams when I’m piecing. The debate goes on and likely will continue as to wether or not it’s best to press your seams to the side, or open, but I’m firmly in the open camp. At our last guild meeting, I talked about how whatever it is you’re piecing lies very flat when you press your seams open, which means that your block will likely end up the measurement it was meant to be. Open seams mean that there will be no dominant or recessive areas in the pieced block, and will wear evenly over time. One of my favorite things to achieve aesthetically in a quilt is to make the blocks appear to float on a large ground, or all that negative space us modern quilters love. I believe that pressing seams open helps achieve that look, as the seam lines seem to fade away after quilting.

Take for instance this beautifully quilted piece. If you look closely, you can see that the seams were pressed to one side. I think that those seam lines distract from the quilting and would have been nearly invisible had the seams been pressed open. In the end, this is just one quilter’s opinion, and I know that there are reasons for pressing to one side that works for others.
Pressing seams open is what led me to using starch. I reasoned that if I was going to spend time pressing, that starch would help keep those seams open and flatten the block even further. The way I make a block, or when I’m piecing, I sew a seam, quickly press the stitches, then run the tip of the iron up the seam which opens them. I give a quick press along the seam, then turn it over to the right side and quickly press once again. Weeks Ringle talks about this process in her own blog post on pressing open seams HERE. And after all that pressing is over, I give a quick and small spritz of sizing or light starch on the back, press, and then the same treatment on the front. Then, and only then, is my seam or block done.
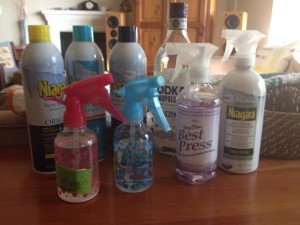
Now for the results of our Starch off – the contenders were: Niagra brand starch, heavy starch, sizing, and starch in a non-aerosol can, Mary Ellen’s best press, and the two homemade forulas; one a cornstarch base, the other a potato vodka base. My favorite and most often-used product, spray sizing, was one of the best at keeping the seam allowances flat against the back of the block. For a little discussion on the differences between starch and sizing, you can find that HERE. Most of the other spray starches gave the fabric I used a nice body, with the heavy spray starch giving a bit more body which was no surprise. The biggest surprise of the experiment was how the homemade corn starch formula performed. It did a fantastic job of keeping the seam allowances down and flat and gave the fabric nice body.
The recipe Lynn used to make the cornstarch spray is:
16 oz filtered or distilled water, 1 tablespoon
cornstarch, optional 1-2 drops essential oil such as lavender – don’t use
citrus as it can scorch when ironed. Mix together in spray bottle with mist
setting. (some posts state that this blend can spoil – so either only mix as
much as you will use right away or store in refrigerator.) Always shake the spray bottle before using.
The other homemade starch spray Lynn made uses potato vodka:
Drunken Starch (Potato Vodka): 8 oz filtered or distilled water, 1 oz potato
vodka (one shot). Mix together in spray bottle with mist setting.
So, there you have it! I personally will most likely stick with my usual sizing spray as it has always given me very consistent results. But, in a pinch, I would definitely make the corn starch spray. Thanks for visiting our blog and we’ll see you at our next meeting!
-Tina
